
I had the great pleasure and good fortune to have recently been invited to attend a one-day mini smile-makeover composite course thanks to Dr Payman Langroudi and Dr Sanjay Patel, the two founders of Enlighten Smiles.
![]()
The course took place back in late 2017, so, I am a little delayed with releasing this post, but better late than never, right?! In fact, I think that it actually works better for me to write this a year later, as I now have better (yet still very limited) knowledge and experience as a fourth-year dental student when it comes to using composite. Plus by writing this post many months after completing the course, it has served as a refresher for me too – remembering lots of the tips I learnt (why am I such a massive dork).

At the time of attending the course, I was still only a third-year undergraduate dental student, and, believe it or not, I hadn’t even done a single restoration, let alone used composite resin on a real patient before!! How inexperienced I was (and still am)?!?!
All of my experiences at that time (November 2017) using composite was when working on the plastic teeth, in the phantom head lab at my dental school! This is important to note because this particular course is aimed at dentists primarily, who are hoping to increase their skills and knowledge with doing highly aesthetic composite work, particularly in the anterior region (i.e. the aesthetic zone). It is aimed at dental professionals who are either already doing a lot of cosmetic work or are keen to boost their skill set and hopefully proceed to do more aesthetic treatment cases.
Furthermore, the composite skills I had (and still have) are very basic. My results thus far have been quite terrible, to be honest; overhangs, shade mismatches, voids, unpolished etc etc etc. I will get better, and this course has guided me down the right path to improvement!
Now, despite my complete lack of experience at the time, I came away from the day with bountiful knowledge and picked up SO MANY little tips, tricks and techniques for how to use composite resin well, and how to use the restorative instruments in the best way possible – to get amazing results. I feel like I got a huge head start by attending the course and felt excited to be able to one day produce beautiful results using the top quality materials, just like the maestro himself, Dipesh Parmar.
Find out more about the course for yourself from their official website, or by watching some of the promotional video content produced by Enlighten on YouTube.

Please note from the start: this post will be based completely off of my own personal experiences from the course, I will be expressing my own opinions and sharing some of the valuable information I was fortunate to gain from the day. I hope you find this interesting, informative and inspiring in some way! Thanks in advance for reading 🙂
—————————————–
The course took place on a Saturday, at a lovely hotel in Bristol, South West England.
Payman had kindly invited me to come and join him with a few others for some dinner in Bristol on the Friday night, but I wasn’t able to make it there a day early, so, unfortunately, I had to pass on that kind offer.
With the course starting from ~9am on the Saturday, it meant me waking up at the crack of dawn to leave my flat in West London to catch an early train from Paddington to Bristol, then a cab to the hotel. It was still dark outside when I let home and I recall it being a cold, gloomy and rainy day – but I was super excited for the day ahead, so the weather didn’t bother me one bit. I almost missed the train…
The cab that took me from the train station in Bristol to the hotel drove past the famous Clifton Suspension Bridge – it was my first time seeing it in person and it didn’t disappoint! What a magnificent marvel of engineering! I have since crossed the bridge on foot, as my brother is currently working as a junior doctor in Bristol – it’s incredible!

Upon reaching the hotel in Bristol, I confirmed my arrival and registered then was guided to a room where I was able to grab a cup of coffee and a few breakfast snacks before we were to be called into the room for the start of the course. All the Enlighten Team present were so welcoming – making me feel immediately comfortable and excited to get started.
Almost immediately after arriving, I met the very charismatic and charming Payman Langroudi, one of the two co-founders of Enlighten who is such a lovely man, very kind and always with a smile on his face. He is also familiar with my dorkydentalstudent Instagram page, which is cool 🙂
The itinerary for the day included an in-depth informational lecture, followed by two hands-on sessions.
Dipesh Parmar was the dentist leading the course. He is an incredible dentist, with incredible skills who practices to the highest of standards. Dipesh is a multi-award winning dentist, with international status. He graduated from dental school at the University of Birmingham and now works in private practice at Acorn Implant & Dental Practice. He has a particular focus on minimally-invasive dentistry, and he lectures on MI dentistry and aesthetic resin techniques for the general dental practitioner. For quite a few years now, Dipesh has been invited to teach a hands-on course to dentists at the American Academy of Cosmetic Dentistry (AACD)’s annual conference – that is a huge deal that exemplifies his status amongst dentists the world over.

Most recently, Dipesh cleaned up at the Aesthetic Dentistry Awards 2018, taking home numerous awards for his work. In fact, that is NINE awards to be accurate. With all his successes and reputation, he remains a very humble and down-to-earth gent, this is an amazing trait of his which was nice to see!

- Winner Single Tooth Composite
- Winner Single Tooth Ceramic
- Winner Single Tooth Ceramic (Hit)
- Winner Full Mouth Rehabilitation
- Winner Full Mouth Rehabilitation (Hit)
- Highly Recommended Restorative Single Arch
- Highly Recommended Tooth Whitening
- Winner AESTHETIC DENTIST OF 2018
- Winner AESTHETIC TECHNICIAN OF 2018

Dipesh shares so many of his impressive cases on his Instagram account – definitely worth following for inspo.
I count myself very fortunate to have had the chance to attend this course and learn directly from Dipesh, a maestro with composite resin! In my future career in dentistry, I can only hope to one day be able to produce results to the standard he sets! That’s why attending this course was so motivating for me, because, all of the skills, tips and techniques Dipesh uses were demonstrated – highlighting that with practice and attention to details, any dentist is able to deliver highly aesthetic results with their direct restorations.

————————————-
MINI-SMILE MAKEOVER – MORNING LECTURE
The morning lecture delivered by Dipesh was incredibly easy to follow and covered so much content. The content was superb and the delivery was also! I made many pages of written notes from his lecture and will share many of the tips I learnt here in this blog post (please note, this is not a comprehensive coverage of everything that was covered, nor for everything I learnt).
The lecture covered the following:
- Tooth morphology and smile design principles
- Material selection
- Occlusion
- Optical properties of teeth and composite resin
- Isolation
- Margin design
- Resin layering
- Finishing and polishing
- Clinical photography

Here’s a list of some of the learning notes I made personally whilst present at the course:
*These notes are laid out quite randomly, don’t worry too much about the flow, simply read through and learn*
We must always aim to be as minimally invasive as possible. If tooth preparation is required for whatever reason, preserve as much tissue as possible and especially enamel. Enamel, in particular, is so important for bonding; the stronger the bond between the tooth structure and the composite resin, the more predictable and long-lasting the treatment will be. Tooth preparation may be necessary with aesthetic smile makeovers in order to create some (more_ space for the restoration.
With smile design, there are various different aspects to consider, these include:
- The lip line
- The smile line
- The dental midline
- The incisal edge position
- The central incisor position and dimensions
- The tooth-tooth proportions
- Axial inclinations
- Gingival architecture
- Connector heights
- Embrasure form
- Labial anatomy
- Colour
Incisor dimensions for smile design dictate that the width of the central incisor should be 70-80% of the crown height. The width of the lateral incisors are roughly 2/3rds the width of the centrals. There is, in fact, something referred to as the ‘Golden Proportions’ equation for teeth that can be followed as a guide.
Embrasures open up as you move distally from the midline.
Principles of smile design and tooth proportions do not exist on natural teeth. So, why do we aim for the ‘Golden Proportions’? We should not be strict with these principles and remember only to adjust teeth that we need to adjust. Do not simply start reshaping a person’s natural teeth if they are healthy simply because you’ve measured them and they don’t meet these proportions. Be reasonable and pragmatic with how you follow these smile design guidelines.
The optical properties of composite resin materials will vary depending on the amount and type of filler within the material. We should be using different composites, with different compositions of filler particles for dentine and enamel layers.
When using hybrid composites, there is a phenomenon known as ‘plucking‘ to be aware of and warn the patient of. This essentially describes how there is a slow and gradual loss of the macro filler particles from the composite surface with wear.
Margination is a term used to describe how well the composite blends in with the tooth at the restorative margins. To get a good blend, we must be careful with our composite layering techniques and aim to use a microfill composite, that has more favourable optical properties.
As dentists, we must all have an appreciation for optical properties, especially with regards to the ‘colour’ of our restorations so that we can ensure they match the natural tooth ‘colour’ in order to blend in beautifully. This becomes especially important with aesthetic dentistry and composite work in the anterior ‘aesthetic zone’. There are three main components to know about: hue, value and chroma.

Teeth display many different qualities that we must appreciate for aesthetic dentistry:
- Translucency
- Fluorescence
- Opalescence
- Surface Texture
Opalescence is apparent at the incisal third of the crowns with reflected blue, and on the approximal surfaces transmitted as amber.
The surface texture of the teeth dictates how light reflects off them. Different textures can manipulate light differently, and it is ultimately how light interacts with the teeth that presents them as a certain shape and colour. Surface texture on a micro-level is especially important with anterior composite restorations – this is one of the details that an aesthetic dentist must take advantage of.
Translucency can vary between patients, and it can depend on factors such as age. Typically, younger patients have more translucency in their teeth than older patients, since, with age, tooth wear destroys the fine, translucent tooth tissue as well as increased dentine deposition (secondary, tertiary and sclerotic dentine deposition). There is also a halo effect near the incisal edges, where the tooth tissue becomes thinner (labio-palatally) and therefore becomes translucent.
Clinical photography is hugely important with aesthetic dentistry, for many reasons – necessary for the patient, the dentist and of course also the technician. There are a number of different photographic angles to capture, including all of those needed for the BACD accreditation.

It is helpful to use a cross-polarisation device when taking photographs – this helps make the teeth look etched, which helps visualise all the details. Also, the contrast and exposure can be increased to help with shade mapping.
Dipesh recommends using the Style Italiano shade sampler. The tabs are made with a different thickness of composite resin for the dentine layer (2-3mm) and then the enamel (~0.5mm). Customised shade tabs can be made and used.
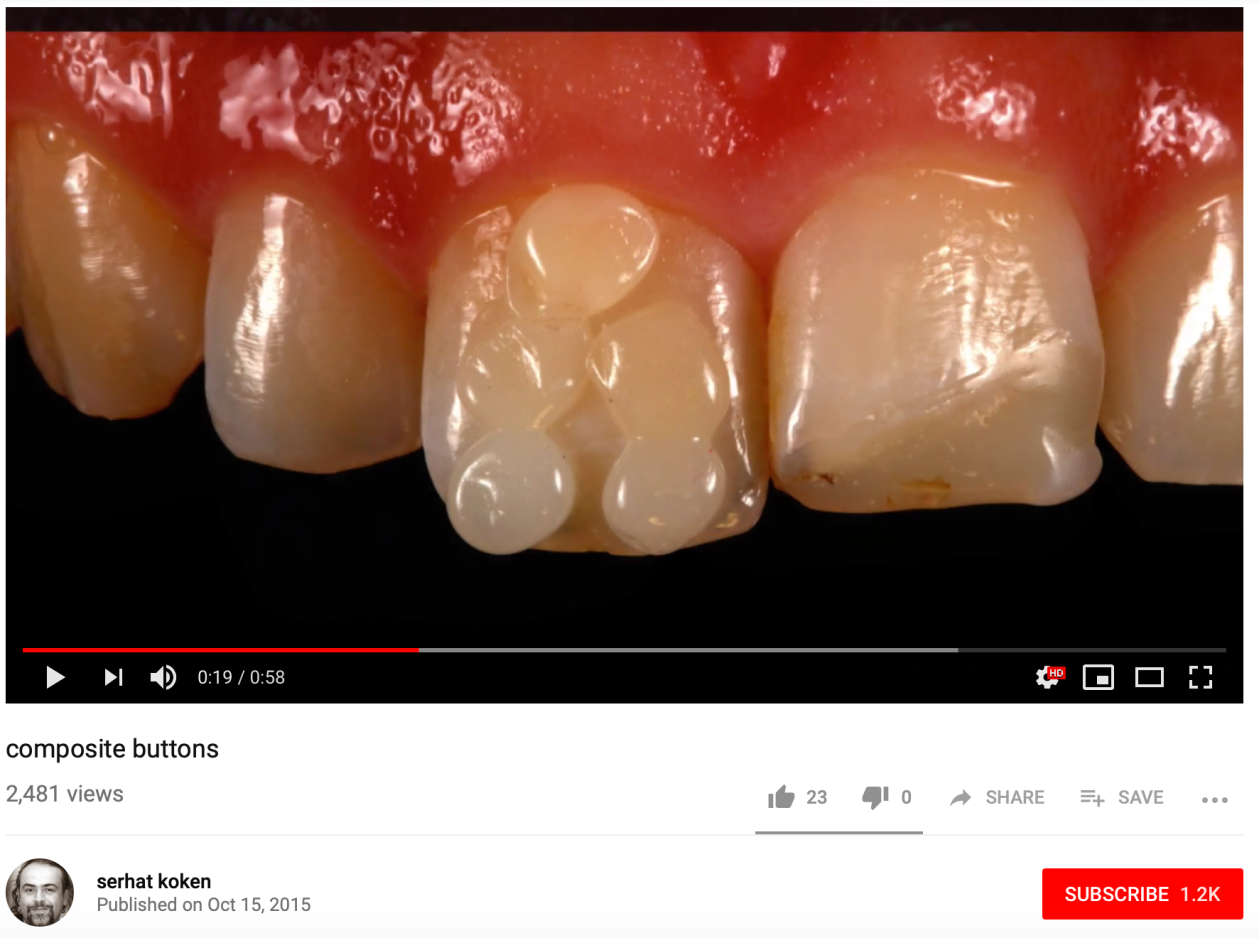
Another way to carry out composite shade testing clinically is to create mini ‘composite buttons’ on the surface of the tooth in question. Place a small ball of composite on the surface of the tooth then light cure it (to factor in the photopolymerisation effects that make it a more accurate gauge). Once the composite buttons are cured on the tooth’s surface, you can see if it matches the natural shade of tooth, or if it doesn’t and needs to be changed before restoring. Here is the link to a short YouTube video posted by the legendary Serhat Koken, who demonstrates this technique beautifully.
Style Italiano also makes a Misura instrument that can be helpful when layering anterior composites to ensure the correct depth of 0.5mm for enamel is maintained. Here’s a YouTube video link I found that perfectly demonstrates the use of this instrument I’ve just mentioned (which I had absolutely no idea existed before going on this course).

When using composite resin, excellent isolation of the teeth for is absolutely essential. Dipesh insists on rubber dam and floss ties. The floss ties help to retract the dam and keep it tucked into the gingival crevice, this helps to stop any of the GCF (gingival crevicular fluid) from coming through the dam and affecting the bonding – ensuring increased moisture control. Also, as Dipesh highlights, using floss ties also looks good in photos!
MARGIN CONFIGURATION
This is all about the margin between the tooth tissue and the restorative materials. If the preparation is flat, the margin can be seen (i.e. a butt joint), which leads to poor aesthetics. Shoulder preparations are not ideal.
Butt joints = poor aesthetics (on anterior teeth)
In order to achieve a highly aesthetic, invisible margin between tooth tissue and composite it is best to use a short bevel/chamfer prep/modified chamfer. This style of preparation also exposes more enamel rods for bonding, therefore a stronger and better bond.
Long bevel preps will also lead to an invisible margin, but this is not minimally invasive and therefore should be avoided. However, Dipesh mentions that when a dentist begins to do more aesthetic dental bonding that requires preparation, the minimal preparation technique skills will improve with experience. So, the more of these cases you do, the better you will get, the faster you will work, the more invisible and the more minimal your work will become! No one is a master when they first start doing something – it takes lots of time, practice and experience! For that reason, I truly believe that I can start as a dental student to practice these skills on phantom heads to build up my early confidence and competence.
————————————-
MONOCHROMATIC = one shade
Most dentists will restore using one shade of composite resin for most cases. This is a perfectly adequate approach with posterior restorations, and for relatively small incisal fractures, class V and class III preps. It is a relatively easy way to deliver cheap, direct composite veneers. Monochromatic restorations can look very good, if they are shaped and polished well.
BICHROMATIC = one enamel shade and one dentine shade
When implementing two shades, one to restore each layer of the tooth tissue with resin, it is so important for the dentist to have an appreciation for and knowledge of the internal anatomy of teeth.
POLYCHROMATIC = multiple shades, tints, opaquers etc
Restorations implementing various different materials and characterisation details deliver high aesthetics. However, it is not easy to do polychromatic aesthetic restorations well, the dentist must be highly skilled. Also worth bearing in mind, as Dr Parmar highlights here is that the more of these world-class restorations you do, the greater the demand for them will become amongst your patients – especially with referred cases!
————————————-
PALATAL WALLS
When carrying out composite restorations anteriorly, to build up, recontour, disguise incisor teeth – it is so important to start by creating a palatal wall. To create this, there are various techniques:
- Take primary impression, cast up then create diagnostic (extra-oral) wax-ups then create the palatal shell of composite on a putty stent of the wax-up
- Do a quick rough intra-oral wax-up then create the palatal shell of composite on a putty stent of the wax-up
- Freehand
Creating free-hand palatal shells can be tricky, so high skill is needed. It saves time and potential lab time (and the associated fees). However, it may not be as accurate as the indirect methods with a stent…
The most important bits are the palatal anatomy and the incisal edge. The thickness of the wall of the composite at the incisal edge must be very thin to be translucent.

PROTOCOL
The single tooth protocol needs more steps since the challenge in these cases will be to ensure the single restored tooth matches the adjacent and contralateral tooth! Whereas, in multi-rooted tooth restorations, less detail is needed for all the teeth individually (as long as they all match one another).
Dipesh says that he articulates his casts, even if it is a lateral restorative case. The articulator stage is so important in anterior composite cases to ensure that the built-up teeth do not interfere in any way with the patient’s occlusal scheme (in static and importantly also in dynamic movement). For example, laterals can be prone to breaking, especially if the patient’s canine guidance is lost or compromised (i.e. they have group function with/without working side/non-working side interferences).
The three most important aspects of creating the putty stent are:
- Interproximal Embrasures
- Palatal Surface
- Incisal Table
Dipesh uses a microfill composite resin (from Cosmedent) for these cases. The microfill is important as it offers lustre and polish (i.e. there can be a very nice finish of the surface of the restored teeth).

Studies show that the anatomy and the shape of a tooth are more important than the colour and the fine details. Therefore, it is important to focus first on creating the primary anatomy, before introducing secondary anatomy and tertiary anatomy into the restorations.
Focus on recreating/restoring teeth based on primary anatomy as the initial priority. In reality, on natural teeth – it is the tertiary anatomy that is lost first. So, focus more on the secondary anatomy (especially in older patients or those with TSL).
Dipesh uses composite brushes for details in his restorations. The brushes help him to achieve line angles in the teeth. He finds that implementing the ling angles during composite application, as opposed to with finishing disks is easier and better.
With finishing and polishing, Dr Parmar uses rubber points (green and brown) for the vertical anatomy as well as polishing disks (coarse, medium, fine in order). He uses these in a slow or in a speed increasing hand-piece. Avoid using the fast handpiece as this can cause damage!
Although it is mentioned here, and Dipesh did discuss it with us, he went on to tell us that he rarely implements tertiary anatomy. It takes up too much time, it is almost unnecessary and with females especially, he has found that lipstick can easily get stuck in the micro-details of the restored tooth surface – staining the teeth!
We can use a pencil to check the line angels. Different line angles give the teeth different shapes. The best thing to do is to match the line angles on the restored tooth/teeth with the rest of the ling angles on natural teeth (so the restorations blend in seamlessly).
If the palatal shell sticks to another tooth or an adjacent palatal shell then use a mini-serrated hacksaw to cut it open. Make sure to move from palatal to a buccal direction for safety and control – but also, importantly, if you use the hacksaw in the palatal direction, it is possible to push the shell of the tooth.
Dipesh uses two composite brushes with his restorations: brush 1 (thin) and brush 3 (wider).

————————————-
EDGE BONDING
Dipesh mentioned that he also uses wax-ups and a silicone index for relatively minor composite bonding cases. He uses a microfill composite to give better margination and of course, doesn’t do any tooth preparation on these cases (Minimally Invasive Dentistry).
Some skilled dentists can and do edge bonding with free-hand techniques, but this takes practice and experience to get right reproducibly.
Top tip: Dipesh mentions he uses a No. 12 scalpel to cut through interproximal areas of adjacent built-up teeth. He finds these better than using finishing strips.
——————————————————————–
HANDS-ON SESSIONS
This was a hands-on course and that’s what makes it special. As well as spending time listening to and learning from Dipesh. We also got to immediately attempt to put into practice what we were shown in a couple of hands-on sessions.
There were two hands-on practicals across the day, one before and one after lunch. I very much appreciated the fact that Dipesh did a live demonstration of the practicals for us, which was visualised on the projector so we could all watch him show us what to do and how to do it step-by-step with his useful commentary. This is definitely an important aspect to note since I am sure there are many other similar courses where there is no live demo – it makes a significant difference in my opinion!
After watching Dipesh show us live how to do it, it was our turn. Thankfully, Dipesh was floating around us to make sure we were all getting along fine and he was there to answer any questions we had, examine our progress and offer additional tips to us individually if needed. Lucky for us, in addition to Dipesh, we also had Dr Richard Field and Dr Millie Morrison helping out as demonstrator assistants. Richard is a multi-award winning private cosmetic dentist too, who in his own right is a big influence on young dentists around the UK. Richard and Millie were both so nice and helpful too.

HANDS-ON SESSION 1
SINGLE TOOTH – maxillary incisor
It was a simple practical to start the hands-on. We had a prepared plastic tooth (i.e. a veneer prep) and we had to restore it using a composite resin veneer. We did the shaping, the polishing, the surface characterisations and the mamelons.
This was a really simple but great way to build up the buccal aspect of an incisor crown with all the minor details. Then a significant portion of the time for this practical was spent polishing once final cure completed giving the composite veneer a beautiful smooth finish, with ideal line angles, incisal character and a high lustre.
HANDS-ON SESSION 2
PEG SHAPED LATERAL
We built up the palatal shell using a putty matrix. Added the dentine layer, the enamel layer, used an opaquer and also blue/violet:grey (1:1) at the incisal edge. We also used light brown tint at the cervical third. Adding two or three mamelons.
This might seem like quite a niche practical if you think about it too literally. In reality, the skills required to build up a peg-shaped lateral tooth to full contour matching the adjacent teeth is a skill that is very much transferable to other common aesthetic composite restorative cases.

I really enjoyed using the Cosmedent materials (Renamel range) and the restorative instruments! So far, I have been limited to using the materials/instruments they have available for us to use at dental school. The course made me appreciate that there is more to dentistry than what we learn at dental school (not that there is anything wrong with what we learn, far from that in fact!). We’ve never been taught how to use tints and opaquers, or brushes to sculpt our composites, or use IPCL instruments.

——————————————————————–
Thanks once again to Payman and Sanjay for allowing me to come on this course! It was amazing and I learnt so much from it. Yes, it was probably done a little too soon in my dental career but nonetheless, I loved it! It has also encouraged me to want to do more similar and different courses like this in my future practising career to develop my skill set and experience. Ultimately, I am certain this course will boost my dentistry even if it is still for another couple of years before I am able to regularly deliver treatments like this.

I had a great time and would recommend the course to anyone. Yes, even dental students (although it is not cheap). It was an inspiring day for me, and I have lofty standards now to strive towards with my own dentistry!
At the end of the day, all course delegates were given a complimentary goodie bag with a couple of Enlighten’s full-size toothpaste products and were offered a special course discount on any materials or instruments for purchase on the day. I noticed that a number of the attending dentists placed orders for materials etc to take back to their own clinics so they could immediately put what they’ve learnt into practice. For me, another benefit was getting to take home the hand-out slides from Dipesh’s presentation – so I can always refer back to his slides or photos if I want to/need to.
There’s a reason why some of the most successful dentists in the UK have also completed the course. Whilst I was there in Bristol, sat just in front of me was Dr Kailesh Solanki, the principal dentist for KISS Dental – an award-winning group of private dental clinics in Manchester. Sat beside Kailesh was his colleague and friend, Dr Andy Mclean. Both Andy and Kailesh have built up a career around delivering high-end aesthetic dental treatments, with a huge component of that being composite resin dentistry.
Another reason why this course was so helpful to me is that it has taught me how to practice! Whilst I am still a student, I am very fortunate to have access to a fully kitted out clinical skills phantom head lab that I am able to pop into whenever I have free time to practice. I have already been in a few times and plan to go many more times over the next few years to practice working with composite, and also practising recreating tooth morphology! Practice, practice, practice! That’s what it takes to be great at anything! This is something I’ve also started to appreciate a lot more having read about ‘The 10,000 hour rule” in Malcolm Gladwell’s book: Outliers.
—————————————————————
If you have read this and have any questions for me, or want to make any other comments – please feel free to contact me or leave a comment below.
![]()
